This tutorial will help you to set the Conversion Tracking system for your website by using OpenX.
If any one selling their products in his webpages and also he was published his products in the web through advertisement . Now he want to track the number of purchase was happened by user was clicked on his advertisements from other websites.For this criteria he need conversion tracking system .
Follow the below mention step to how to set up Conversion Tracking System in OpenX .
Step – 1 : Set conversion tracking Enable on our system.
First you need to check the whether conversion tracking was enable in our system . You can check this one by switch to Administrator account and then go to ” Configuration > Global Settings > Conversion Tracking Settings ” .
Check the check box “Enable Conversion Tracking” was enable or not in our OpenX . And you need to set the
Default Ad Impression Connection Window : Time duration in seconds , if user was seen his advertisement before this duration then only conversion will counted.
Default Ad Click Connection Window (seconds) : Time duration in seconds , if user was made conversion after clicked on his advertisement before this duration then only conversion will counted.
If you didn’t set this value then you need to set for the individual campaigns. Don’t forget to save the Changes you have made.
Then you need to create the Tracker for individual advertiser by clicking on any one of advertiser in advertiser listing page . then Go to “Advertiser > Trackers ” page .
Click on “Add new tracker” link then you need to enter the tracker details .
Name : Name of the tracker .this is only Required field.
Description : optional,Description about this tracker.
Conversion Type : option,This is also used for identification.Choose your types.
Default Status : You should select this as “Approved” status else conversion will not track.
Link newly created campaigns by default :If you check this check box then only next your new campaigns all are automatically linked to this Tracker.Else you need to manually link to this tracker.
Don’t forget to save the Changes you have made.
Step -3 : Link campaign to tracker
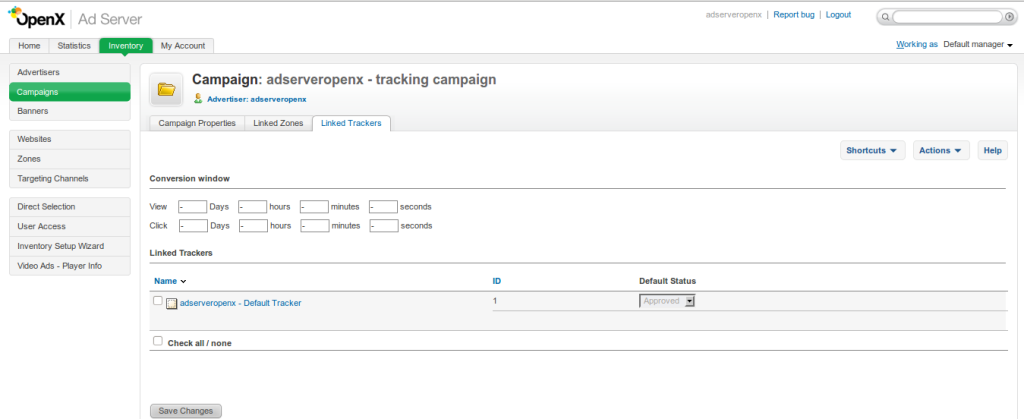
After created the tracker then you need to click on the trackers then go to “Linked campaigns ” on that tracker sub-menu to link the campaign to track the conversion . This tracker was track the conversion from these linked campaigns only . You need to click on the Check Box to right side behind the listed campaigns to link that trackers with that campaigns.
Don’t forget to save the Changes you have made.
Step – 4 : Set conversion windows time
If you didn’t set the Default conversion windows time in admin side (Step – 1) then you need to set individualy for every campaigns by clicking on individual campaigns .
Don’t forget to save the Changes you have made.
Step – 5 : Add Conversion tracking variable
Then you need to click on the “Variable” section . This is not important to track the conversion.This is optional value only .This will used to send the some variable to advertiser while conversion tracking time .
Tracker type : Required,Choose you tracker type
Variable Name : Required, Enter the name
Description : Optional ,Description about that variable
Data Type : Required, Select variable type
Purpose : Required, Purpose of that variables
Reject if empty? : Optional .if no value is passed in for this variable, don’t use this value in calculations while conversion tracking time.
Dead up conversions?: Optional, This will used to avoid the duplicate conversion if the value was same again.
Variable hidden to : Required, hide the variable to no, some or all websites
Don’t forget to save the Changes you have made.
Step -6 : Add Tracker append code
This is also Optional value. You can set the HTML code after conversion was happened by the user to see the page.
You can select whatever type of tracker code as your wish .Image type code doesn’t support tracker variable and tracker append code .
Step 8 : Enable Conversion count in Admin side.
Default OpenX conversion column was hide in statistics page.You can enable to show the conversion in statistics page by go to “My account > Preferences > User Interface Preference ” .
There you can able to enable whatever you need to show on Statistics page .Column Rank Should not to same with other element .
If you need any other help to set conversion system then put your comment here else contact us in Contact US page.


2 Comments